Today, I’m going to attempt something really difficult: distilling one of the most complex topics—food forest design—into the most practical, basic steps that anyone can follow.
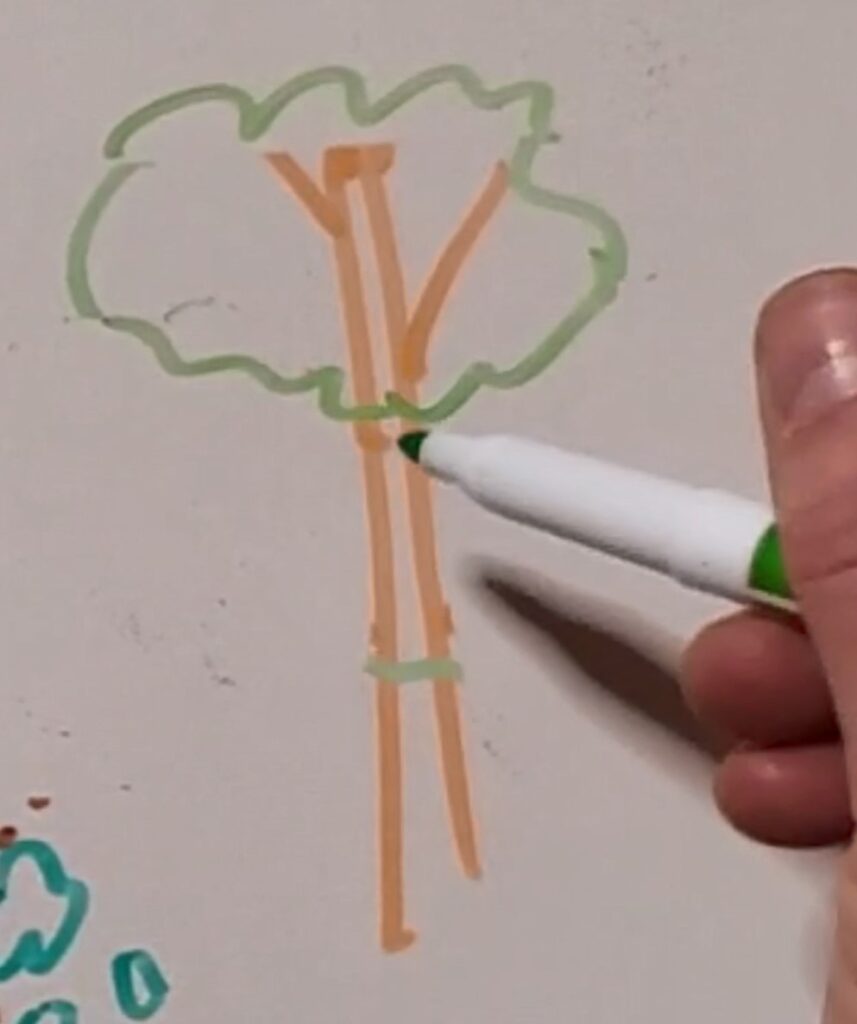
Starting with the Canopy Layers

You’ve probably heard of the different layers of a food forest. Sometimes people say there are seven layers, or even nine. But for this first pass at designing your system, I recommend just focusing on the main canopy layers.
Basically, we’ve got:
- The main canopy – the biggest, tallest trees
- The subcanopy – medium-sized trees
- Shrub species – smaller woody plants
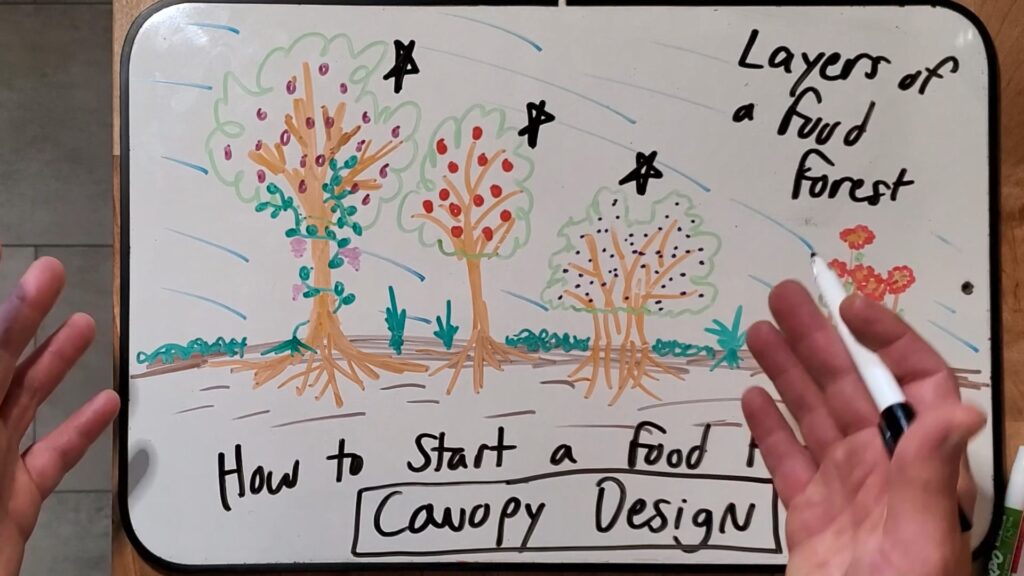
These are the backbone of the ecosystem you’re planting. While they start off tiny and don’t do much shading or soil building early on, over time they’ll grow and begin creating a whole new microclimate underneath. They’ll buffer wind, soften temperature extremes, and improve conditions for the understory species.
For example, bare soil exposed to sun will swing dramatically in temperature. But even a small layer of vegetation can stabilize the microclimate and make it far more habitable.

Step 1: Understanding Your Site
The first step in designing a food forest is getting a good understanding of your site conditions. This process is called site analysis. I did a deep dive on this in another video.
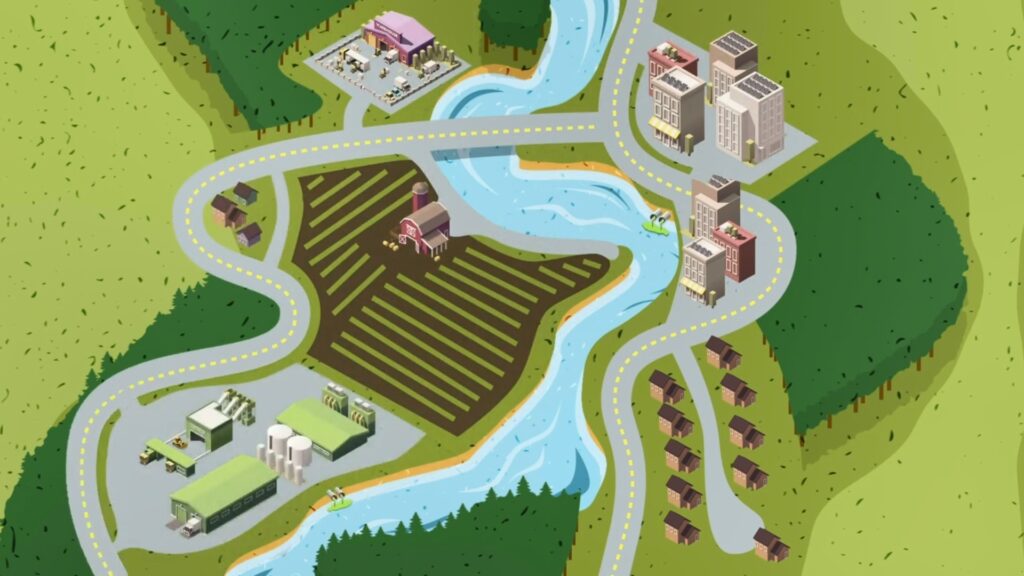
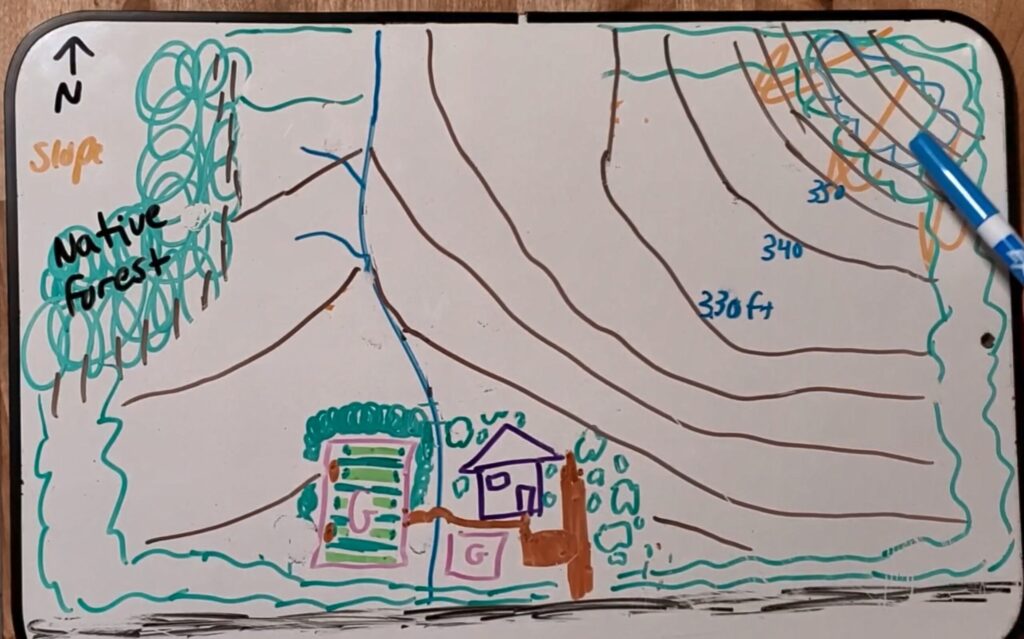
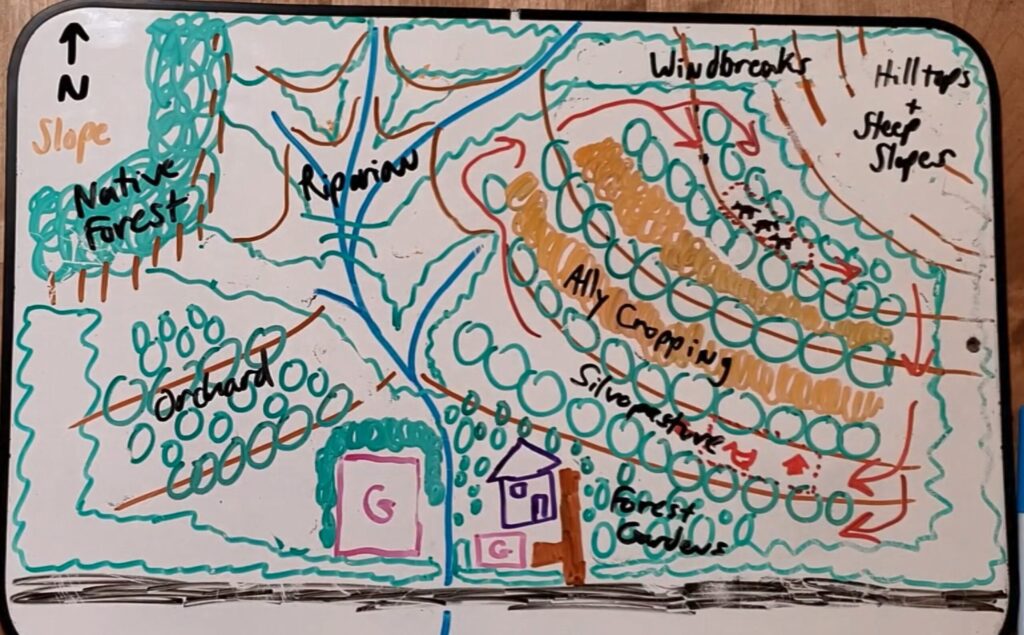
Model Site
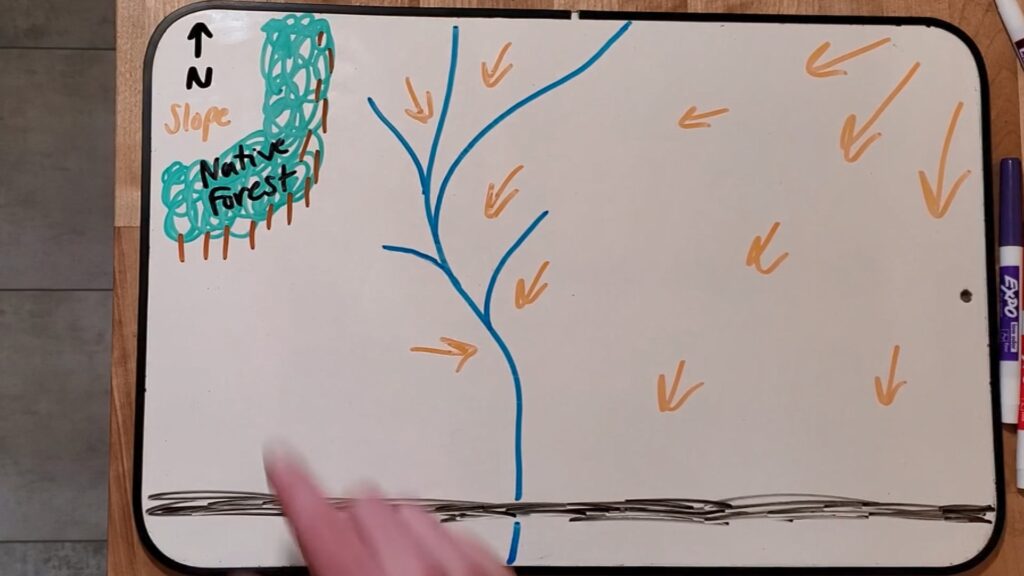
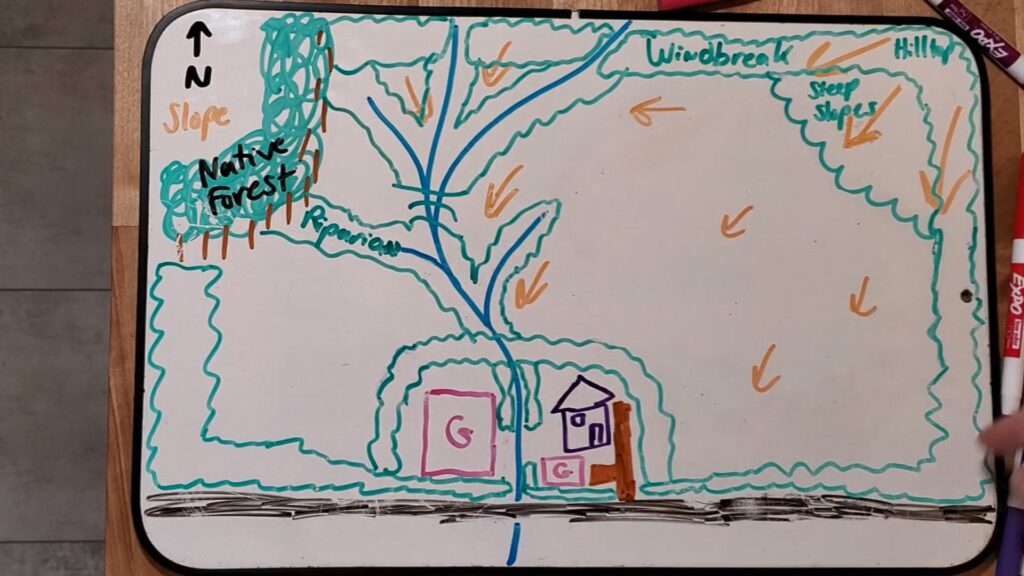
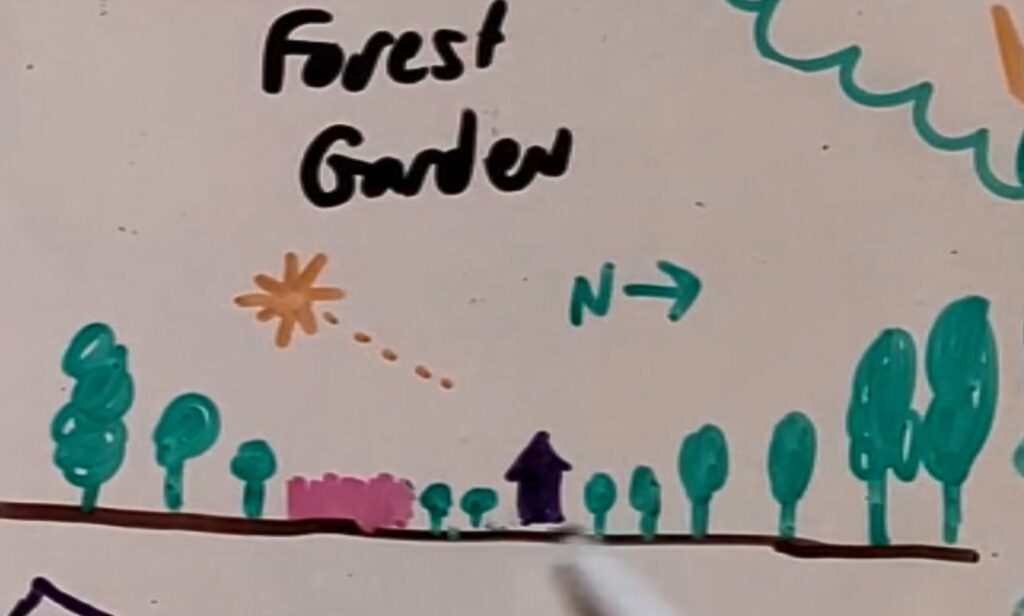
Let’s create a simple model site. Here’s a road, a stream, and a patch of native forest. I’ve also drawn in some orange lines to represent slope—the longer the lines, the steeper the slope.
First question: Where would be a good place to put a house, based on slope?
House Placement
If you imagine a side view of a hill, placing a house at the bottom would put it in a flood zone—not ideal. Placing it at the top exposes it to strong winds and makes it harder to haul materials. The mid-slopes are generally the best place for a settlement.
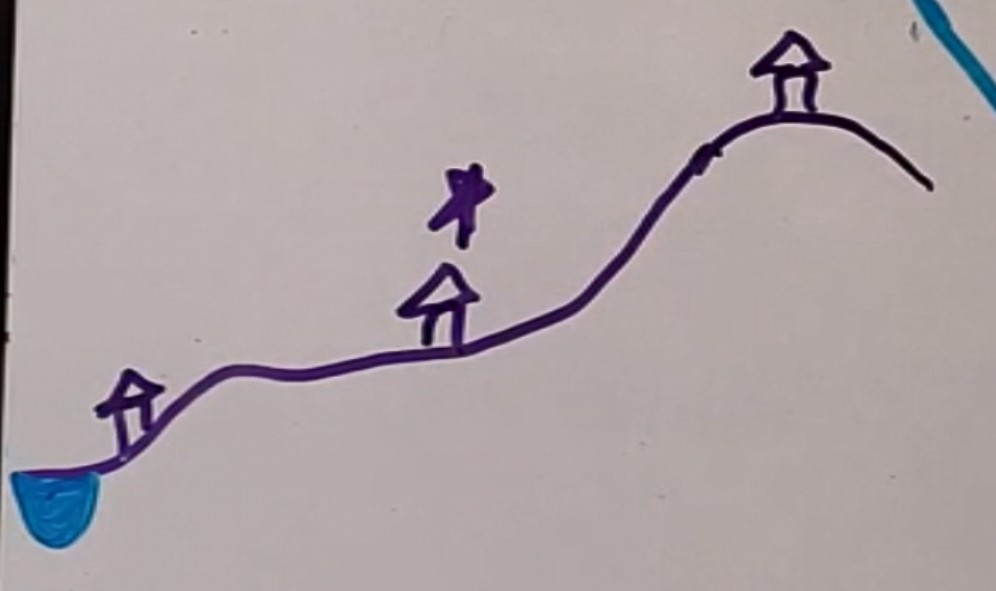
So, I’m placing our model house—or rather, a small settlement—on the mid-slope. It’s better to think of this as a cluster of shelters sharing infrastructure and utilities. That allows people to work together to steward the land, which is much more resilient than relying on a single household.
I’ve read about different models of land ownership, including community land trusts—something worth looking into if you’re exploring collective land management.
Scaling the Design
While I’m demonstrating this on a larger property, all the design principles I’m sharing can be scaled down to a much smaller property—or up to a larger one. It’s just easier to illustrate the ideas using a larger example.
And remember: all your design choices should be based on your own site’s specific conditions and local context.
Observing Soil Conditions
Once you’ve mapped the general layout, start looking at soil conditions. Where is the soil rich? Where is it poor?
For example, the soil near the stream is likely to be rich and fertile. That’s because water brings life—vegetation grows, dies, and builds up organic matter. On the other hand, the steepest slopes often have poorer soil due to erosion—unless they’re forested, in which case the soil might be quite good.
Nutrients move with water, too. Wildlife excreting on high ground means those nutrients get carried downhill and deposited in low-lying areas. These are what we call sinks, as opposed to sources that generate and shed nutrients.
Species Niche Analysis
Once you’ve done your basic site analysis, the next step is looking at specific plant species. We’ll zoom in for a moment and do what’s called a niche analysis—understanding what a species needs to thrive.
There are a ton of details you could look at, but I’m going to simplify it to a few main ones:
- USDA growing zone – for example, Zones 3 through 9
- Sun preference – full sun, part sun, or full shade
- Soil moisture – dry, moist, or wet
Understanding Sun, Soil, and Niche Needs
Most plants are going to prefer either full sun or part sun. Full sun means six or more hours of direct sunlight per day. Partial sun might be just a few hours of direct light or dappled shade.
So that’s part of the species’ preference. Then there’s soil type. You could get specific—acidic, alkaline, etc.—but to keep it simple, I think of it as either dry, moist, or wet.
The difference between moist and wet: “wet” means continuously waterlogged, like a wetland. On our model site, the only truly wet soil would be right along the stream bank—or somewhere with constant graywater input, like a drain from the house.
“Moist” is basically soil that gets watered. (Or the forest soil) So if you’re out in the field and it’s not getting any water, it’s probably going to be dry. Your garden is a good example of moist soil—it’s not constantly soggy, but it gets watered regularly, so it stays moist. And most plants, again, are going to thrive in moist conditions.
Example: The American Plum
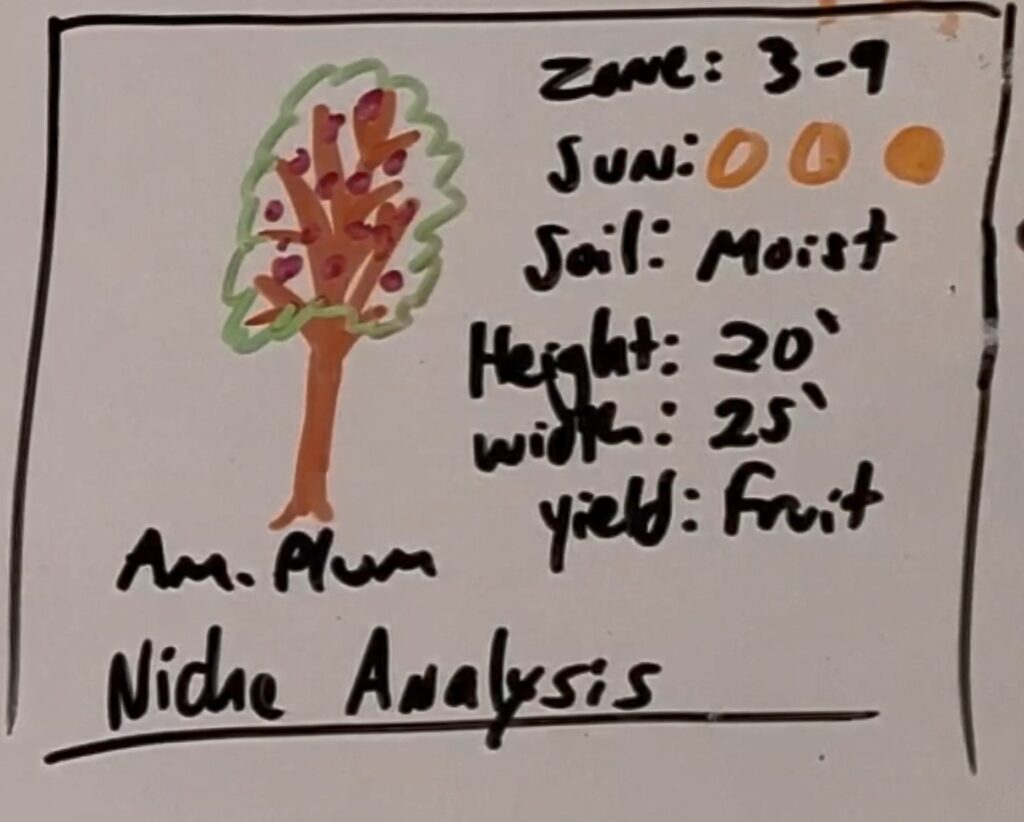
Let’s take the American plum as an example. Its mature height is around 20 to 25 feet. You can also look at the spread—it’s usually close to the height.
What does it yield? In this case, fruit—valuable for both humans and wildlife.
Before planting any species, it’s helpful to do a basic niche analysis. Understand its core needs and where it will thrive. For instance, with the American plum, here are a few places you wouldn’t want to plant it:
- Deep in the shaded understory of a mature forest
- With its roots in wetland soil, right next to a stream
- In extremely dry areas without irrigation
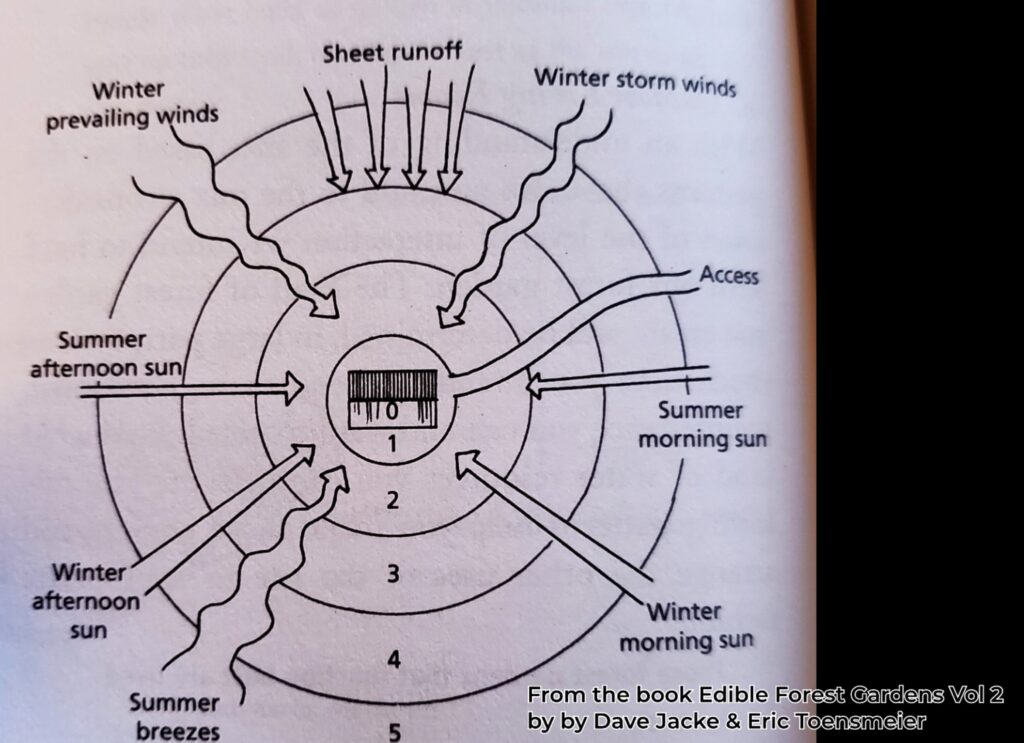
Sunlight, Shade, and Placement
Also, think about its position relative to the sun. We’re in the northern hemisphere, where shadows fall to the north for most of the year. So if your tree grows tall, it might cast a big shadow on your garden—maybe not ideal.
And if you plant it too close to the house, the crown or roots might eventually interfere with the structure, requiring constant pruning.
Access Matters
Think about how you access the rest of your property. If you plant a tree at the end of your driveway, will that block vehicle access to your back acreage? Trees should enhance your site—not limit your options.
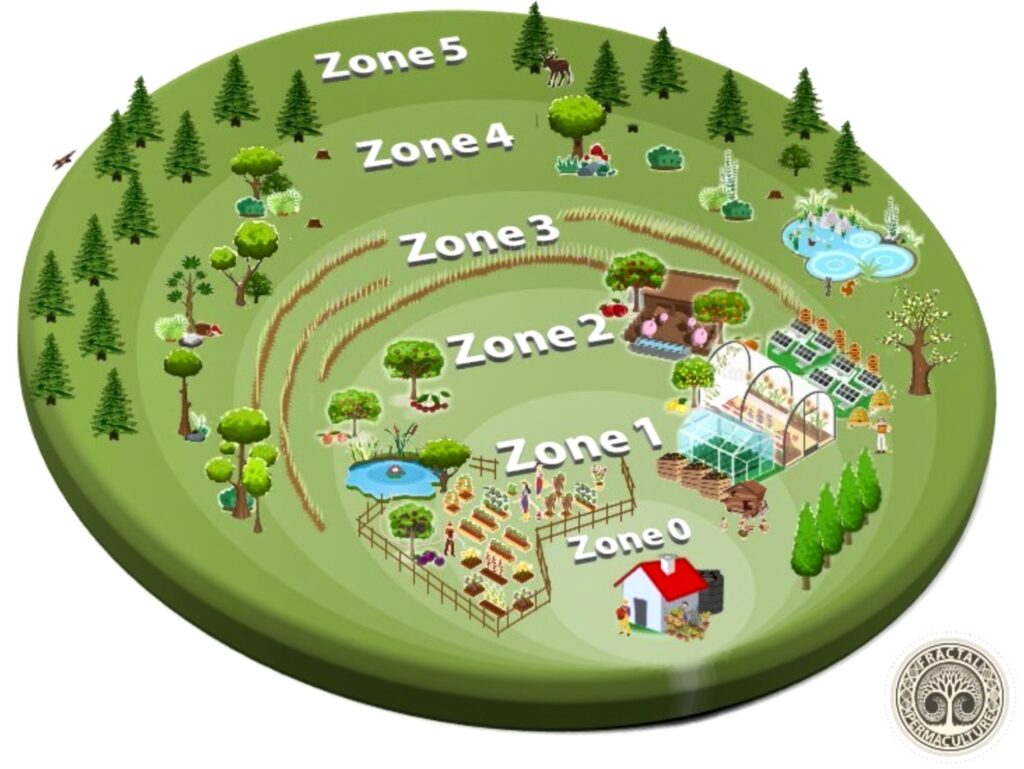
Introducing Permaculture Zones of Use
This brings up an important concept: Zones of Use. Think of these as conceptual concentric circles that help guide where to place things on your site, based on how often you visit them.
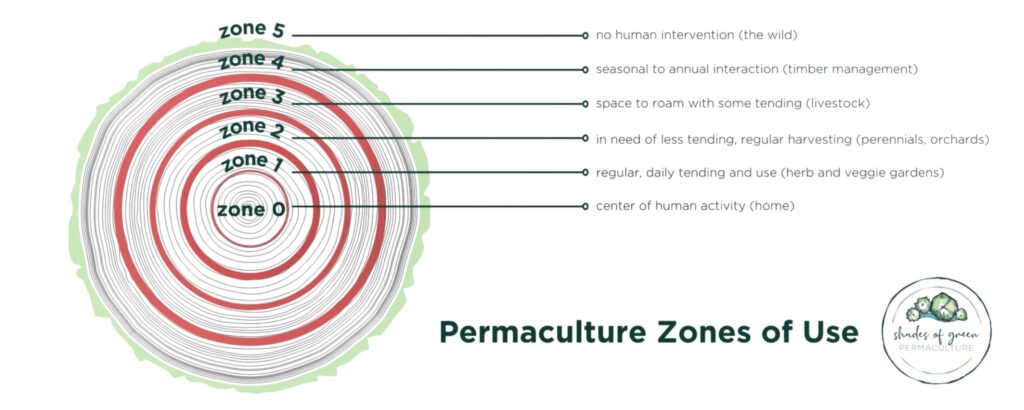
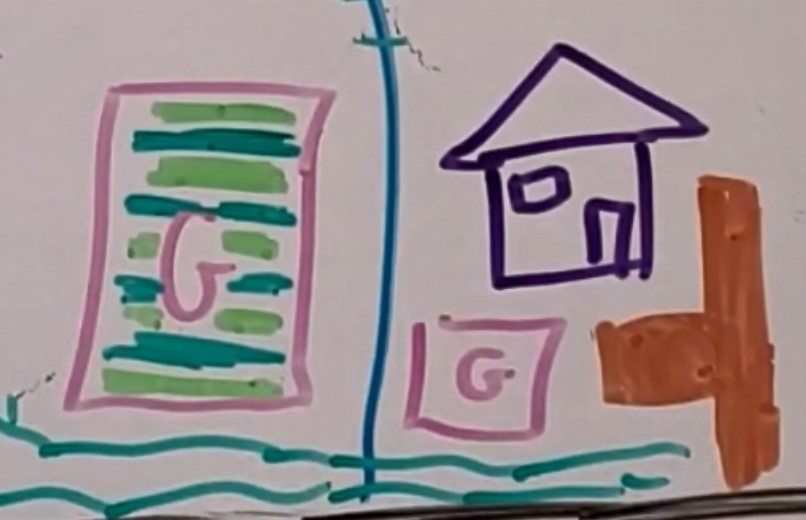
- Zone 0: Your home. This is the most highly managed space. Every detail matters.
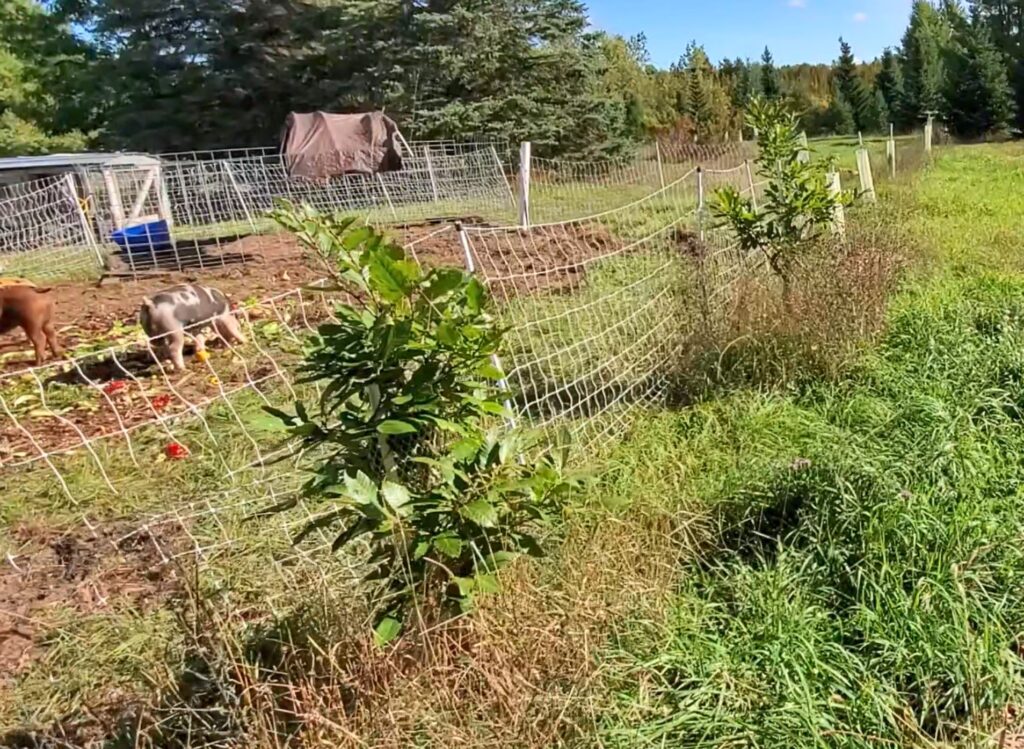
- Zone 1: The immediate area around your house. This is where you want to place things you visit every day—your compost pile, gardens, hoop house, maybe a picnic or sitting area. It’s high-density and intensively managed. Generally, you don’t plant your biggest canopy trees here.
- Zone 2: Areas you still visit regularly, but not quite as often. These might be slightly removed from the home for reasons like noise or smell—like a chicken coop or barn.
Zones 3 to 5: Stepping Out from the Core

Zone 2 is also a great place to start your forest garden. Zone 1 will still include forest garden elements—edible landscaping integrated close to the home—but Zone 2 is where you might begin incorporating your smaller shrubs and trees in greater diversity.
Zone 3 steps further out. It’s less managed and typically where you’d place larger livestock that need more space—pigs, cows, sheep, and so on.
Zone 4 is managed very lightly. You might only visit it a few times a month. This could be where your mushroom logs, orchard, or sugar bush live.
Zone 5 is considered the unmanaged zone. It’s wild nature. It’s the teacher. You still might harvest or explore it, but it’s the least touched by human hands.
Agroforestry Patterns: Start with the Basics
The zones of use concept is super helpful when we start thinking about where to plant different things. Another way of approaching design is by looking at types of agroforestry systems. Here’s the order I think is easiest to implement, in terms of knowledge and impact.
Oh, and just to clarify—it’s alley cropping, not “alley crapping.”
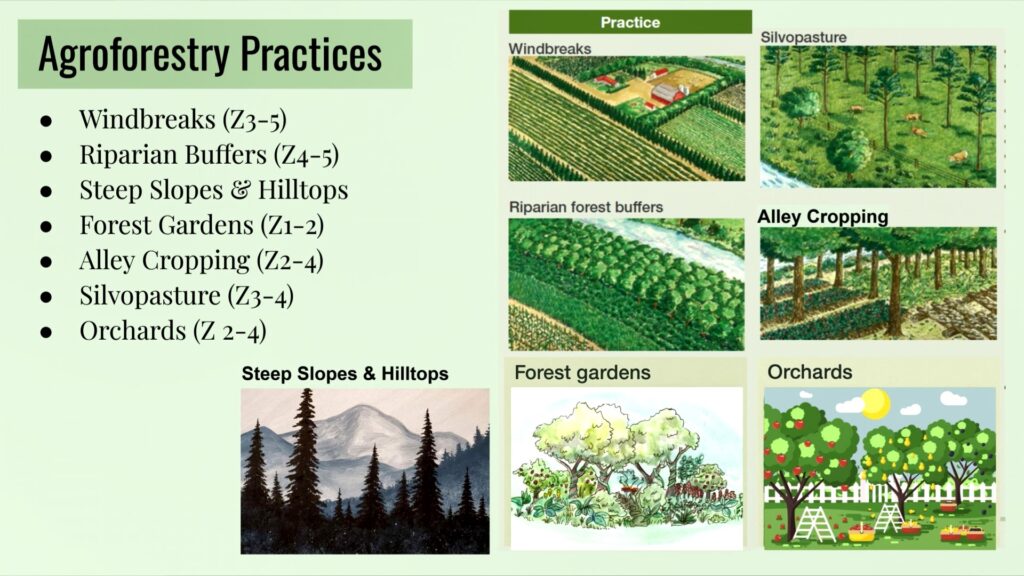
1. Perimeter Windbreaks
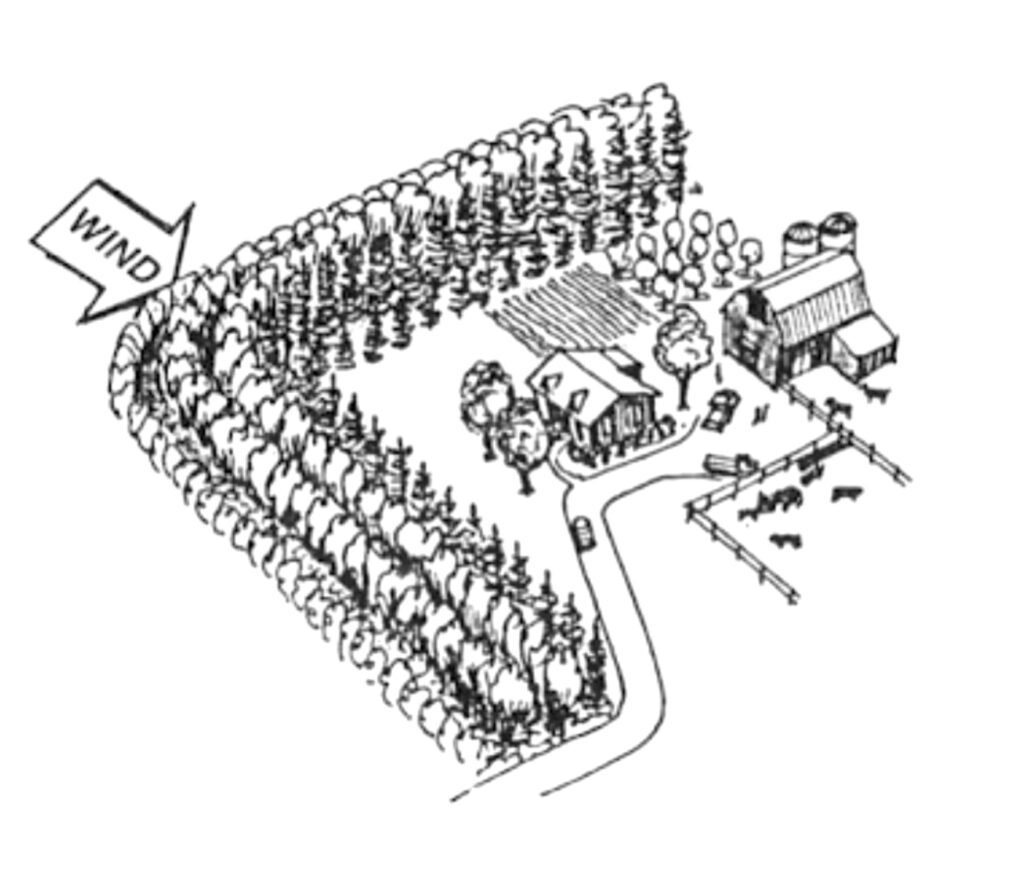
Almost any site can benefit from a perimeter windbreak. Assume the borders of the board you’re looking at are the property lines (except right up by the road). The windbreak might get narrower in front of the house and gardens.
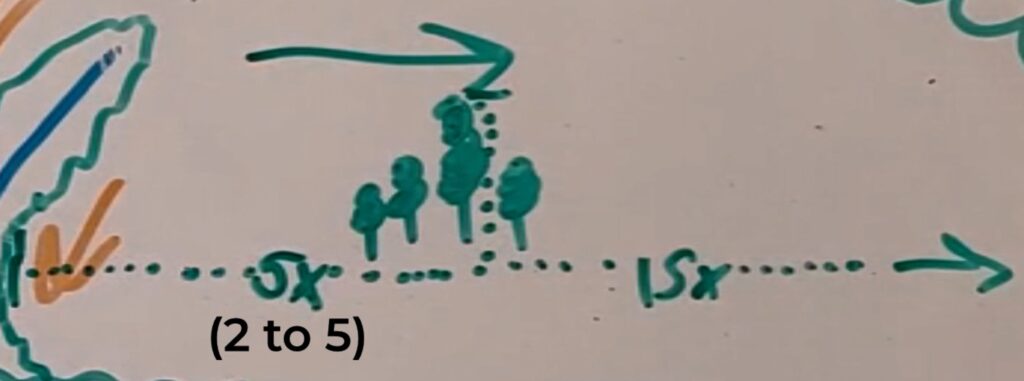
You want an airfoil shape—and at least three rows of trees. If the trees are, say, 20 feet tall, their wind-slowing effect can stretch 2-5x their heigh upwind and 15x their height downwind.
When planting, avoid strict grid rows. Instead, stagger them in a pattern called tessellation. You can also plant smaller, sub-windbreaks closer to the garden and house.
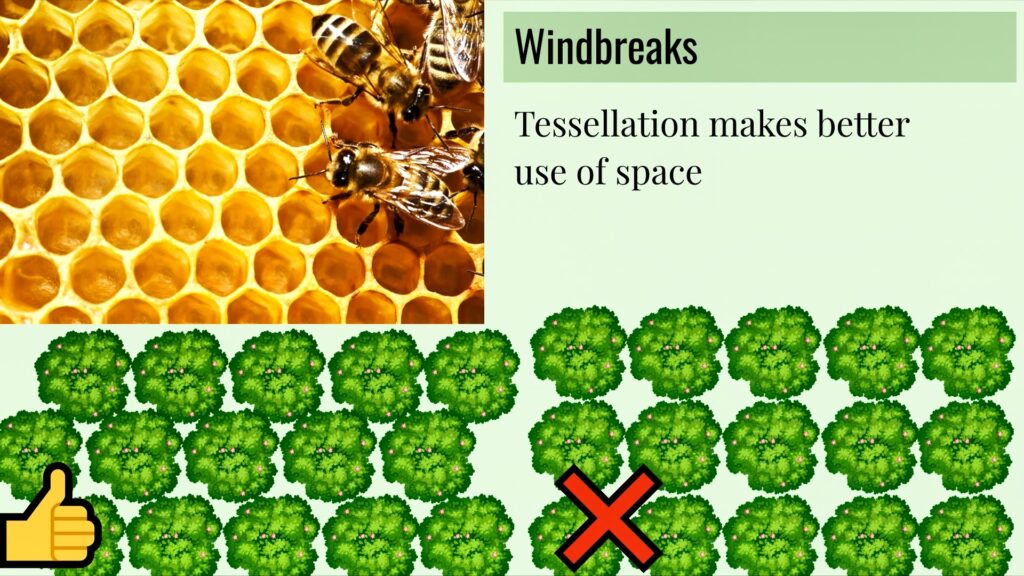
These trees aren’t just for wind protection. They can yield nuts, timber, firewood, and animal habitat. Include conifers like white pine or spruce to keep your windbreak effective during the winter when deciduous trees drop their leaves.

2. Riparian Buffers
Next up: riparian buffers. Any waterway or body of water should have its edges planted with vegetation. These buffers reduce erosion and nutrient runoff while filtering potential chemicals—acting like a natural purification system.
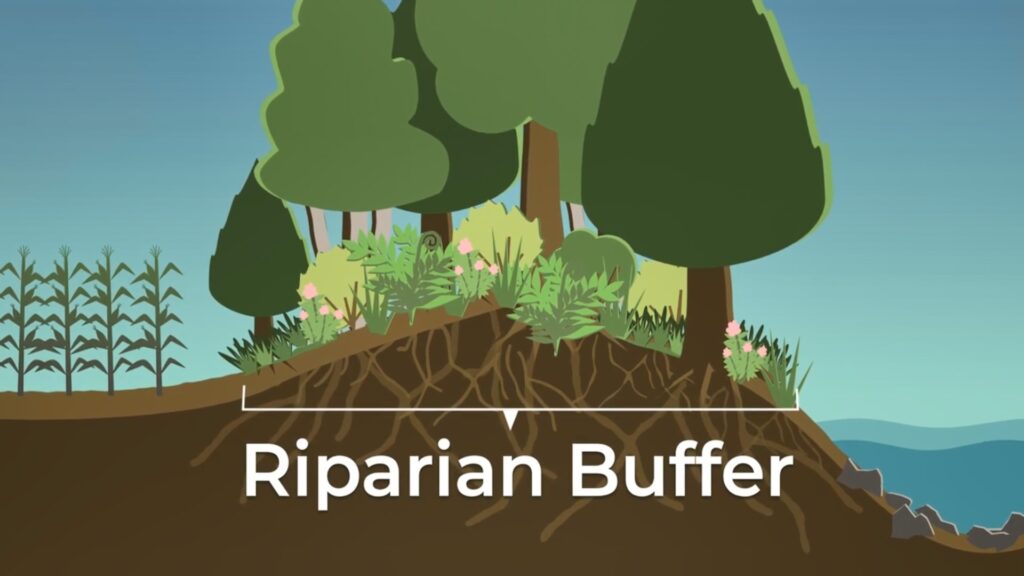
Wetlands are nature’s water filtration systems, and that’s essentially what you’re replicating. Riparian buffers are a core design element for a healthy ecosystem.

3. Foresting Steep Slopes and Hilltops
The third “no-brainer” pattern: plant out your steep slopes and hilltops. A good rule of thumb: anything with more than a 20-degree slope should be planted in permanent forest. Agriculture on steep slopes is risky—erosion, soil loss, instability—unless you’re doing terracing, which is a whole lot of work.
Hilltops are important because they recharge the water table. When it rains, water can either run off and cause erosion or soak into the soil. Infiltration is generally better—it slows down runoff and lets water gradually replenish the groundwater.

By planting trees on hills and slopes, rain hits the leaves, gets slowed down, and then soaks into the earth. The whole hillside becomes a sponge, slowly releasing water throughout the year. Over time, this can even raise the water table and create springs. Forests on hilltops—the headwaters of your watershed—can stabilize streams and rivers.
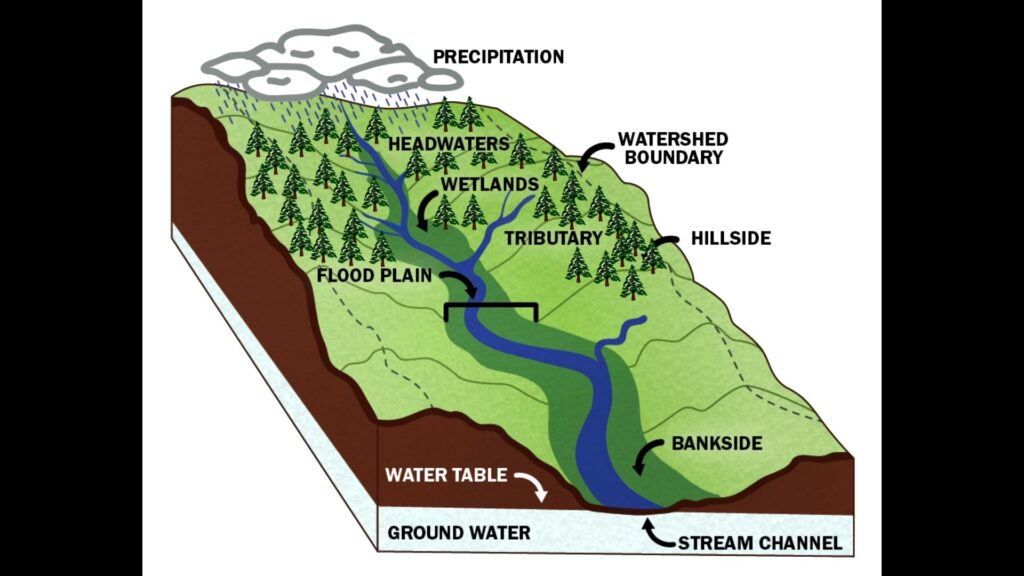
 So by planting forests and building soil, you’re turning your entire site into a sponge. And that’s a good thing.
Framing the Whole System
To me, these three are foundational food forest design patterns you’ll want to implement on almost every site. They form the frame that supports your more detailed designs.
It’s wild to think how, in our society, we’ve normalized removing these essential elements from the land—like stripping off your skin and exposing your organs to the world. Not a great idea.
Also, think about wildlife habitat. These elements create corridors and pathways for animals to move safely across your site.
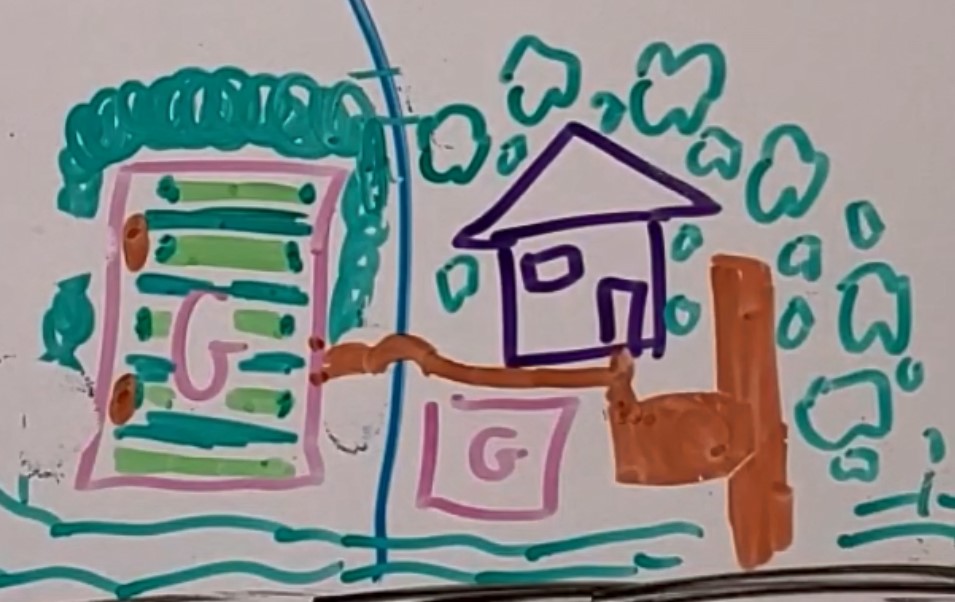
Forest Gardens: Zooming In
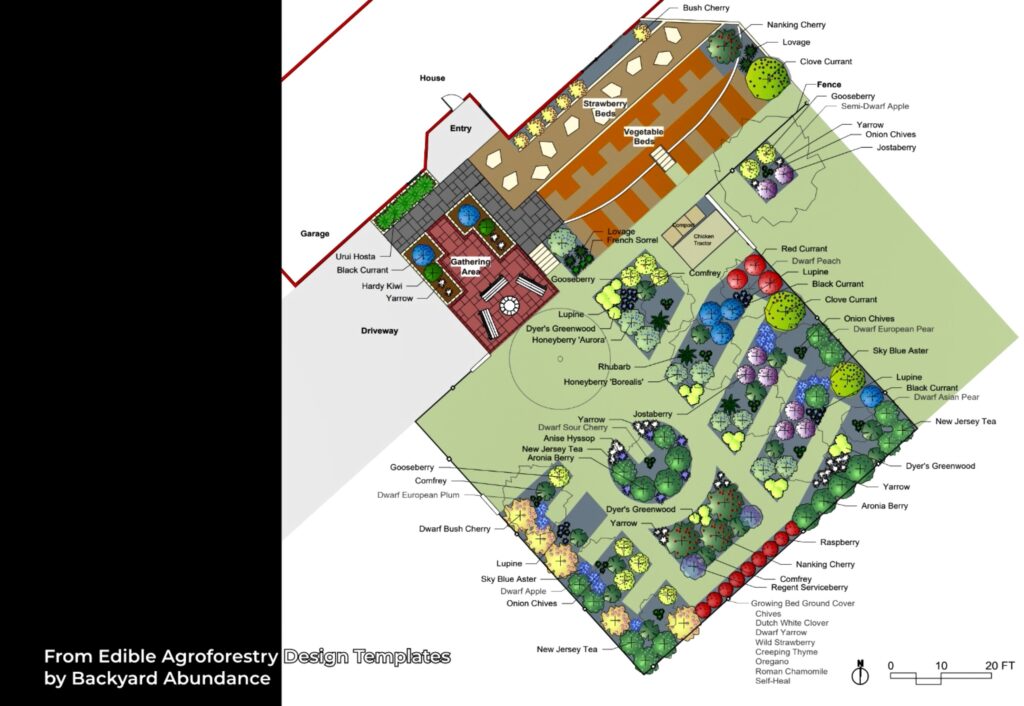
Now let’s zoom into the forest garden. This is what many people picture when they hear “food forest.” It’s a highly diverse area where you grow crops on multiple layers—including annual vegetables. In fact, your forest garden can be inside your regular garden.
What I like to do is incorporate the alley cropping concept: alternating strips of perennials and annuals. Let’s say the dark green zones are perennials, and the light green are annuals. That means you’re already integrating perennial crops into your garden.
On the garden ends, you might plant flowers like fennel, yarrow, bee balm, or calendula to attract beneficial insects. Around the edges, include smaller trees or shrubs to create a wind buffer. Further back, you can go bigger—hazelnuts and elderberries transitioning to smaller shrubs like currants, gooseberries, and goumi.
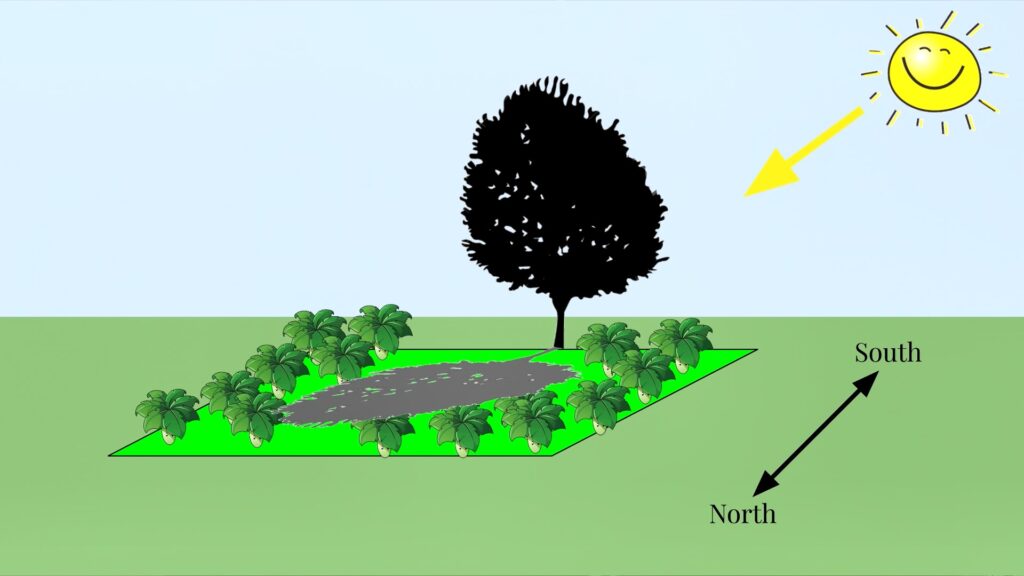
The goal is to taper the canopy height away from the garden so you’re not shading it out. You’re creating a gradient—a bowl shape, essentially—where light still penetrates and productivity remains high.
Designing the Forest Garden: Access, Layout, and Layering
To give you a visual, imagine the forest garden in profile: a kind of bowl-shaped canopy that allows more light to penetrate. You might have the occasional larger tree scattered throughout, but overall the shape ensures you get the benefits of partial shade without blocking out too much sun.
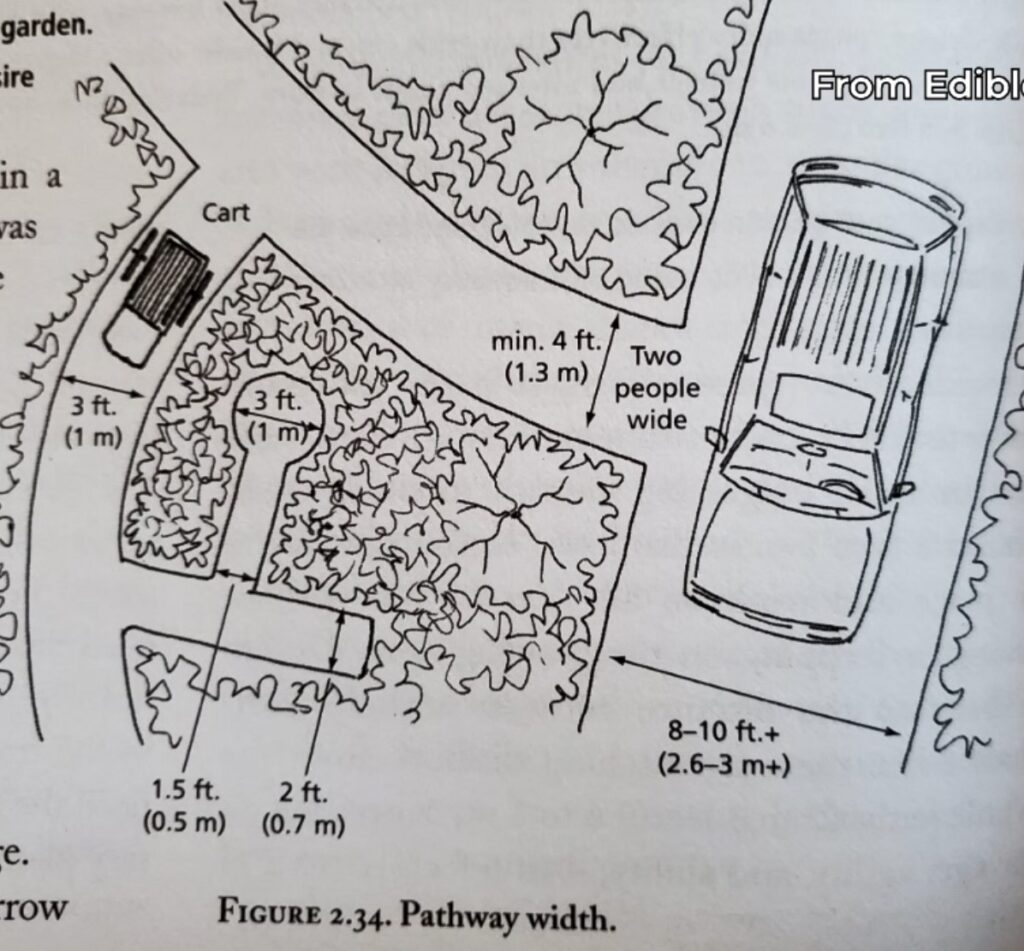
One important factor is access. You don’t want to obstruct movement through the space. Maybe you’ve got a pathway and a bridge over the creek that leads right up to your door. That’s a good start.

Also consider access for materials. I like to be able to deliver materials directly to different points on the property. You might create an entryway near the fence to drop off bulk resources—compost, wood chips, hay—so you’re not hauling everything through a single gate. It’s just practical.
Living in the Forest Garden
From there, the forest garden probably expands outward from your house. You’re essentially living in it. Edible plants are woven throughout your home landscape. Think about your access paths in a branching pattern:
- Main branches – vehicle access roads
- Secondary branches – wheelbarrow paths (2-3 feet wide)
- Final branches – foot-only trails
Around the home, you’d want plants you use all the time. Your herb garden can be in beds, in landscaping, or even tucked among trees. I like to include onions, walking onions, apples, pears, Asian pears, plums, strawberries—things you can walk outside and snack on anytime.
Check out our Forest Garden Plant List here.
Forest Garden Principles

Zone 1 and Zone 2 forest gardens can be a bit chaotic, and that’s okay. Just make sure plants aren’t colliding. A good rule of thumb: aim for 40–60% canopy cover. Leave enough space not just for access paths, but for sunlight to reach the lower layers.
And don’t be afraid to experiment. Just plant stuff. You can always remove it later. You can prune, you can limb up trees (remove lower branches), or top them (cut off the top). You’ve probably seen this under power lines. These are all valid ways to manage large trees if they end up in the wrong spot.
This area becomes your genetic seed bank—a mother colony you can draw from to plant out the rest of your site over time. Your garden is also your tree nursery. It’s where everything begins and then gradually spreads out.

This is the most intensively managed and biologically diverse part of your food forest. And if you’re in an urban site, it might be all you have.
In another video, I’ll zoom into the finer details—plant guilds, polycultures, companion planting, and all the tricks to make these systems thrive. But for now, we’re staying focused on the big picture: there are many different types of food forests, and each one functions a little differently depending on your site.
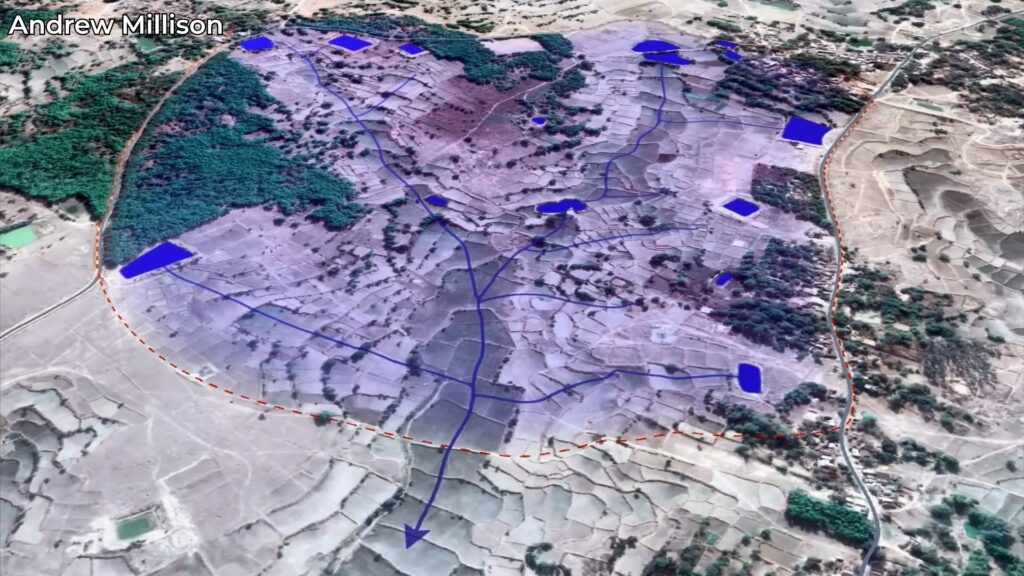
Contour Lines and More Advanced Food Forest Patterns
Now we’re getting into the more advanced stuff—silvopasture, alley cropping, and orchards. But before we dive in, let’s talk about contour lines.
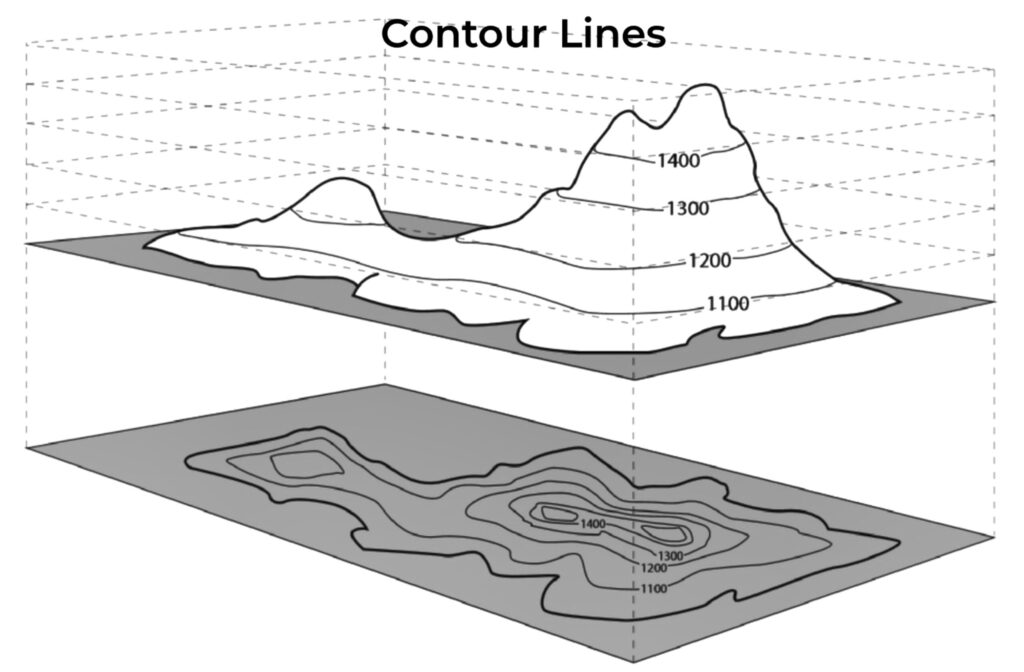
Contour lines are a more accurate way of representing slope. Instead of using arrows, contour lines show elevation. If you dug a trench along a contour line and filled it with water, it would all sit level. The lines are usually equally spaced in elevation—maybe this one is 330 feet above sea level, and the next is 340.
When the lines are close together, that means the slope is steeper.
Contour Farming
By planting along contour lines, you create a water catchment system that slows erosion and encourages infiltration. You don’t have to plant right on the 10-foot lines—you can interpolate. The key is to maintain consistent spacing.
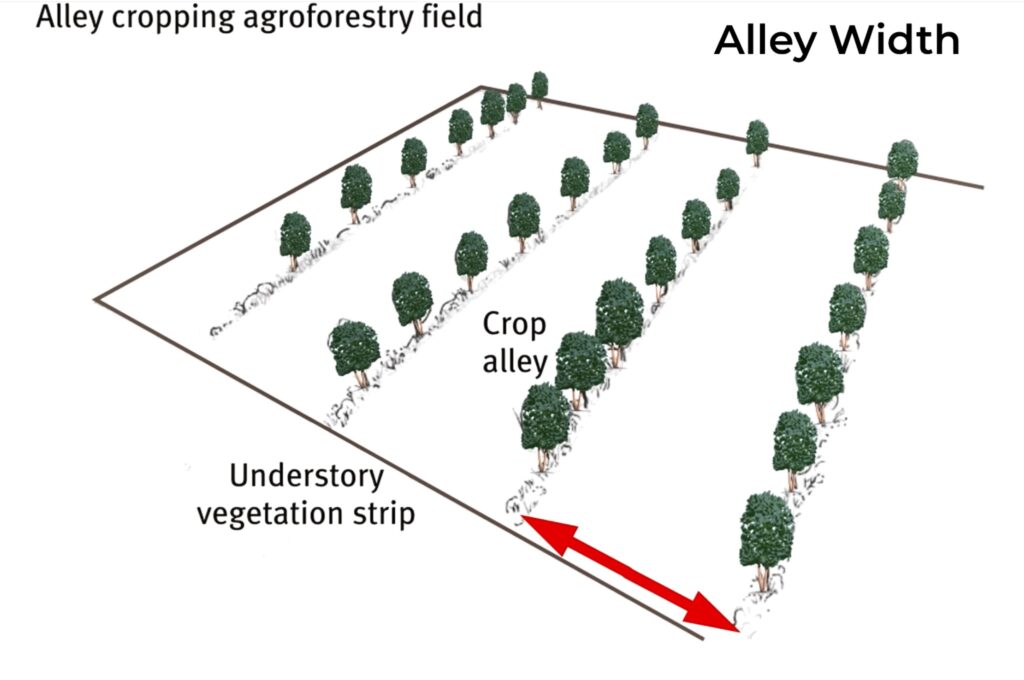
You’ll need access at the ends of each row. Alley width is also important. A general rule: space alleys 1.5 to 2 times the height of the tallest tree. So if your trees grow to 30 feet, your alleys should be 45 to 60 feet wide.
If you’re using machinery or animal pens, let their size help guide your spacing. Contour lines don’t have to be perfect curves—you can wiggle around a little to create consistency and practicality.

Planting along these lines protects your land from erosion, supports water retention, and creates more stable ecosystems.
Orchards, Alley Cropping, and Silvopasture
Planting on contour lines helps charge up the underground water supply—turning your land into a big sponge that helps feed streams and rivers throughout the year.
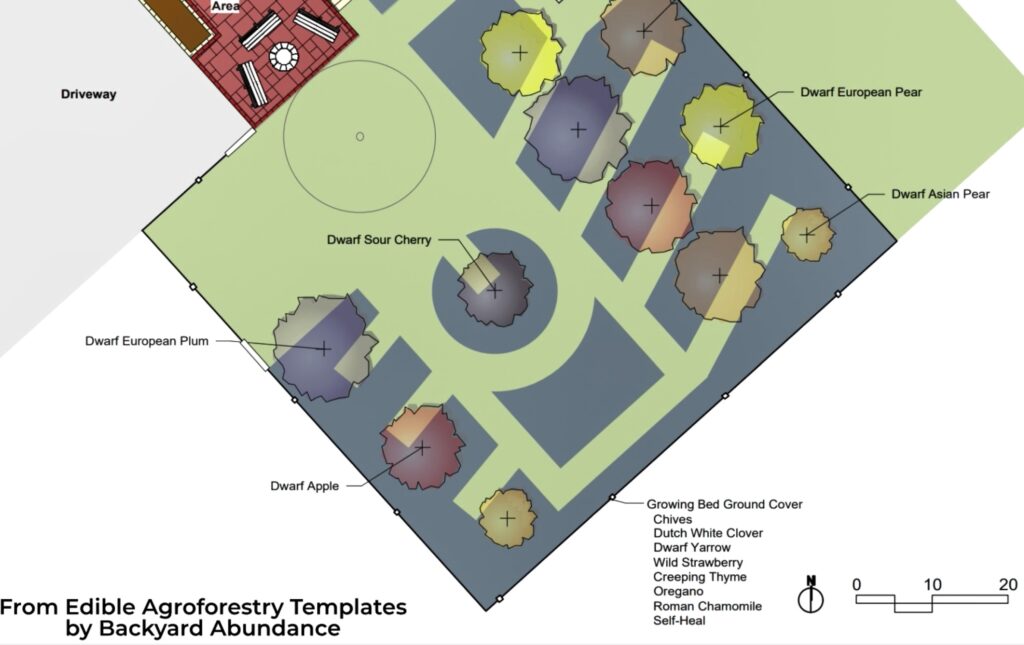
Orchards
Now for your orchard. Maybe you place it a bit further out, in a spot that’s harder to get to and doesn’t require daily attention. You’ll essentially be filling in the alleys with trees—while remembering to leave access paths on either side. (Of course, this isn’t to scale.)
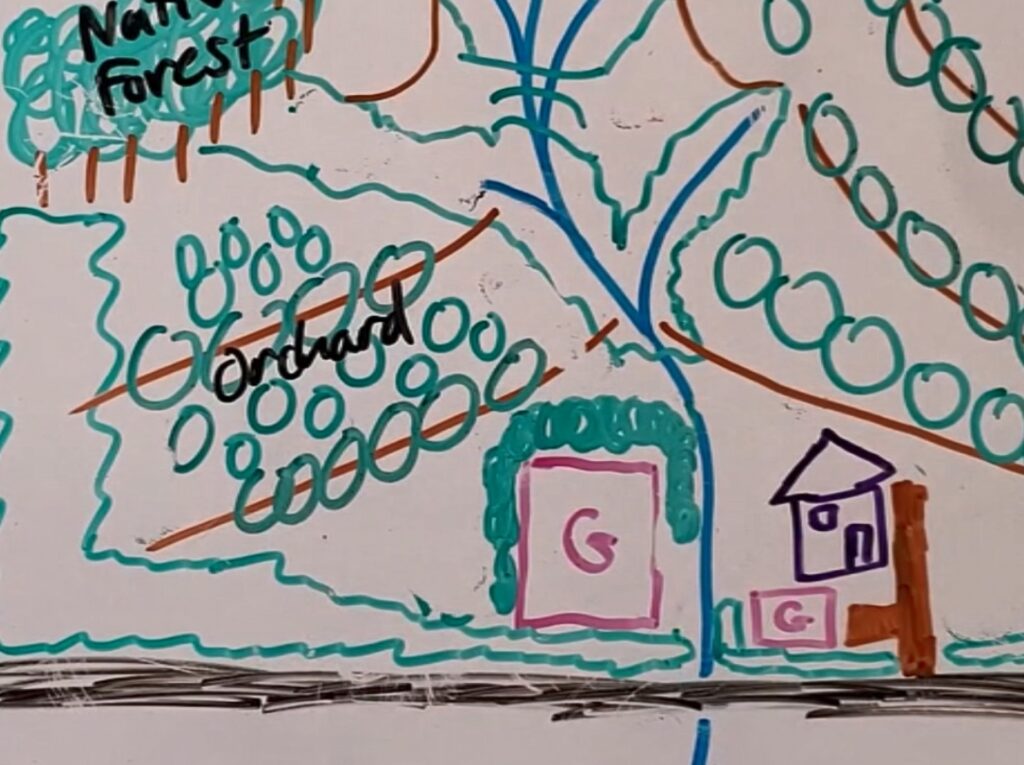
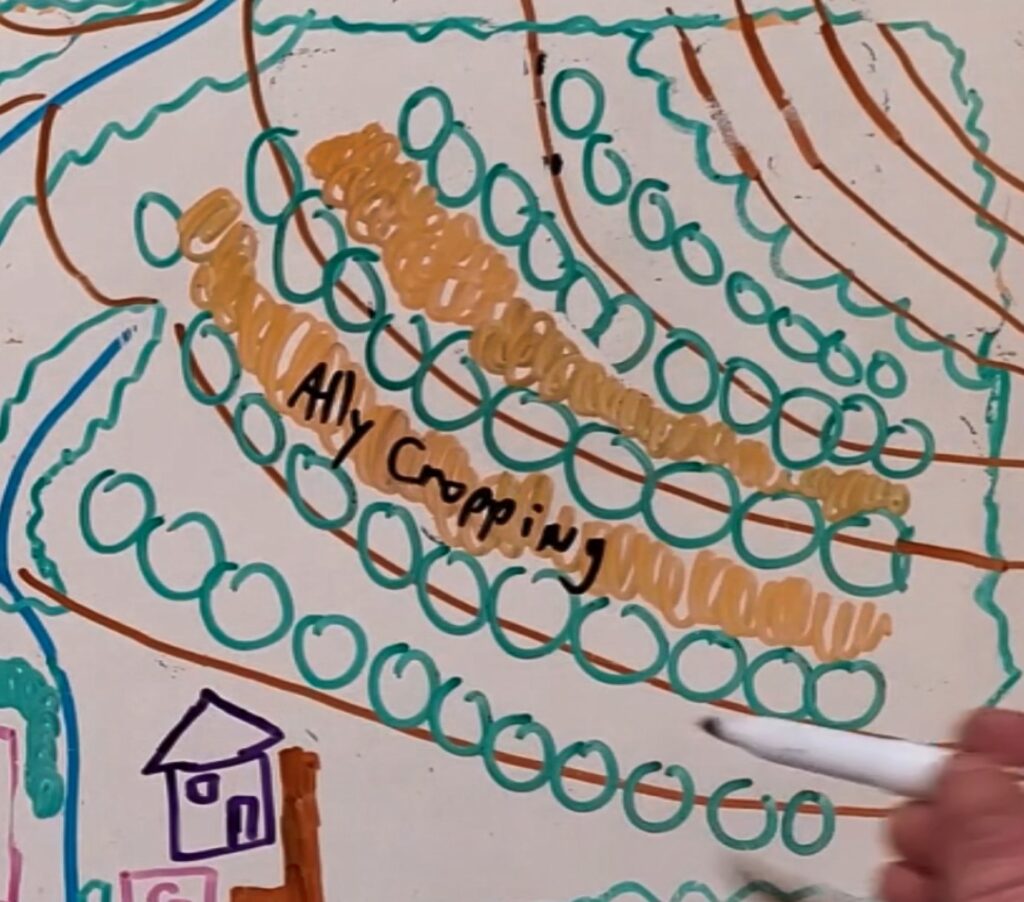
Alley Cropping
The flat areas are perfect for alley cropping. That means planting crops in the spaces between rows of trees. These alley crops could be sunflowers, corn, squash, or asparagus, for example.
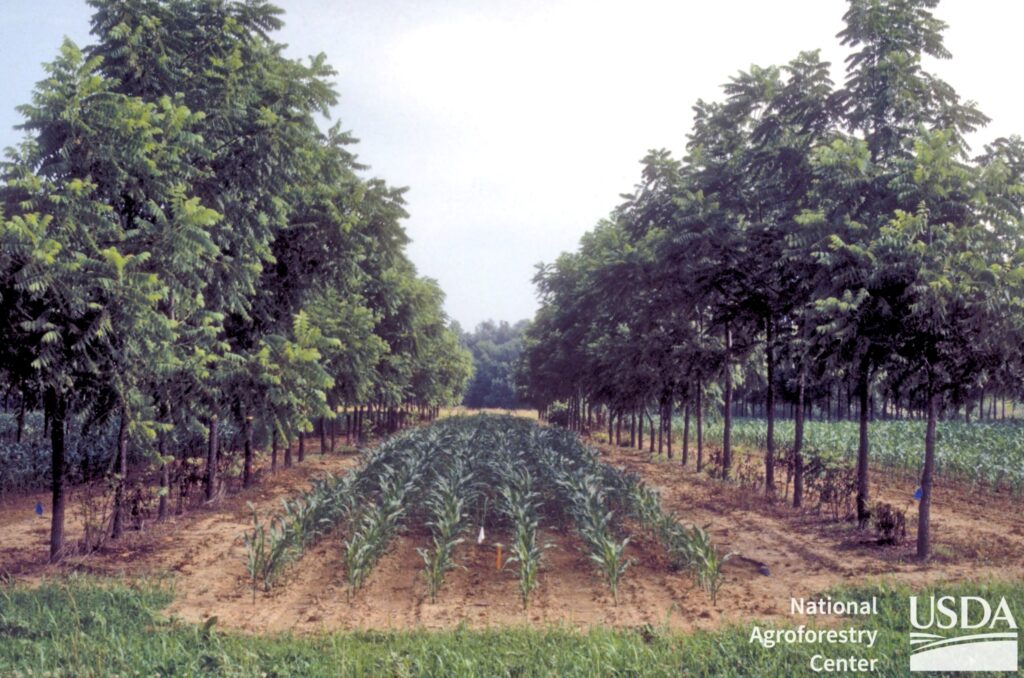
This is a simpler design pattern and often involves growing a single main crop. While monocultures are typically discouraged, in this context we’re working at a larger scale while still achieving ecological benefits. Because of the healthy design of the broader system—moderating wind, building soil, supporting biodiversity—these small patches of monoculture are far less harmful and still contribute to a regenerative system.
So with alley cropping, you’re getting multiple yields: the crop in the alley plus a perennial tree crop.
Silvopasture
Silvopasture follows a similar idea, but instead of crops between the rows, you have livestock. This might work best on slightly more sloped or less ideal land. You can even allow animals into orchard areas to some degree.
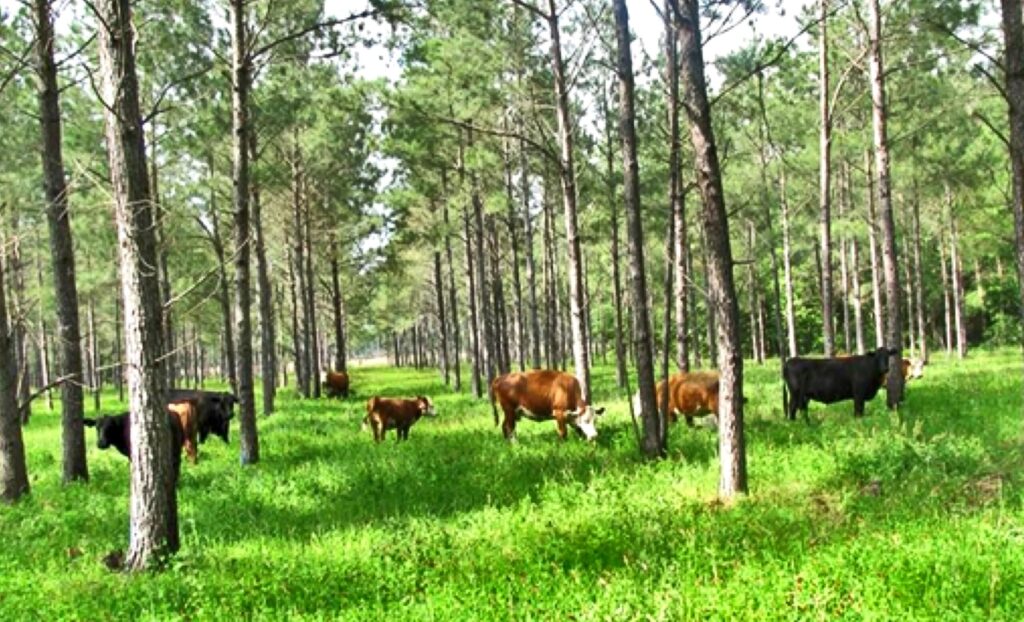
For example, chickens could range under the orchard canopy, while cows graze in nearby pasture. Use mobile electric fencing to move them strategically.
The trees help provide shelter from wind and sun, which can be harsh for animals exposed in open fields. That said, you generally don’t let livestock into the area immediately around young trees. Instead, they move through the alleys.
In specific, short-term situations—like when chestnuts or apples fall—you might allow pigs into the tree rows to clean up. But only if the trees are well established (10 years old or more), and you monitor them to ensure they’re not rooting and damaging the soil around the trees.
Managing Crop and Tree Systems
The alley cropping and silvopasture areas might focus on three main tree crops—for example, chestnuts, apples, and hazelnuts—especially in a commercial setup. In your orchard, you’d likely grow large volumes of fruits you want in abundance: apples, pears, plums, and mulberries.
Conclusion: Patterns Before Details
So there you go—a crash course in food forest canopy design.
We haven’t even gotten into the understory yet, or the fine-tuned layouts of these systems, but we’re following a key principle in permaculture: patterns to details. Start big. Understand the broad strokes and foundational patterns, and then zoom in to design the specifics.
Now you’ve got the context for how all these little pieces fit into a coherent, thriving system.
And of course, every site is nested within larger systems—your neighbors, your community, the watershed, the climate, the economy, industry, and policy. All of these shape and influence your land. It’s important to keep those in mind too.
That’s all I’ve got for today. If you found this useful or helpful, drop a comment, leave a like, and definitely subscribe if you want more content like this.
Let’s reforest the world.